Wrists, Yoga, and Pain-free Practice
CLICK ON HEADING TO READ MORE
Co-written with Adam Hocke, with special thanks to Jason Crandell for his guidance
If you practice vinyasa flow yoga, the reality is you’re going to spend a lot of time bearing weight on the delicate structures of your hands and wrists. The problem is that this is not their intended function. For example, when was the last time, save a social media campaign, you walked to the grocery store on your hands? As the action of weight bearing through the hands is a bit unnatural, it can potentially introduce discomfort, pain, and even injury into your yoga practice.
But with smart and aware alignment, healthy wrists and hands can allow you happily to explore the stretch, strengthening, and energetic buzz of postures and transitions that require weight bearing.
In this post we would like to lay out the anatomy of the wrist and common injuries and pitfalls of practice, as well as give you tips for healthy and sustainable alignment that will keep you flowing.
HEALTHY AND AWARE ALIGNMENT FOR WEIGHT BEARING
Spread your fingers gently
As teachers, we often see over enthusiastic ‘jazz hands’ as students all too eagerly follow cues to spread fingers. Too much of a spread may put strain on the fascial wrapping around your carpal bones (the retinaculum) and could introduce pain and discomfort. If in pain, this fascial wrapping may already be inflamed, so back off or experiment with the amount of finger spread until pain diminishes. In general, a gentle spread will help encourage even grounding throughout the hand, and give full usage of the finger pads for balance and stability without irritating the wrist.
Push and Pull
In addition to the push and reach commonly instructed in downward-facing dog pose, also press your fingertips into the mat and create a slight pull with the fingertips towards the heel of your hand. While the mounds of your fingers should press into the floor, the knuckles can gently lift. This also helps engage the muscles that stabilise the shoulder blades, allowing the arm, hand, and wrist to be supported to muscular force and strong connective tissue that goes down to the base of the spine.
Turn the hands out… but not too much
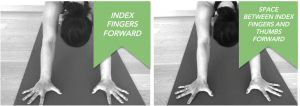
When placing the hands, let the wrist creases turn out by turning your index fingers or the space between your index fingers and your thumbs to point towards the top of your mat. This slight external rotation at the hands will rotate the arms and encourage well-balanced enlistment of the muscles that stabilise the shoulder girdle. Therefore your hands and wrists will have many more muscular friends helping you support the weight of your body. Students with hypermobility in the shoulder can ignore this instruction as they may need to limit external rotation to increase stability.
Furthermore, turning the hands outward too much may diminish your capacity to use the ‘braking’ mechanism that is found through and even balance between front and back of wrist. When working handstands or poses that require you to stop force from falling forward, be especially aware of how much hands are turned out.
Distribute the weight

Distribute the weight across the palm of your hand, making sure that the weight is directed into the mounds of your fingers instead of the heels of your hands. Especially press down through the mounds of your thumb and index finger in order to not overwork the ulna side of your wrist. Furthermore, utilize the strength of the rest of the body. Shoulder girdle will be stabilizing, core will be engaging, and legs will have some activity. The more the rest of the body is alive and working in a pose, the less the full brunt of support will fall upon the wrists.
Firm up
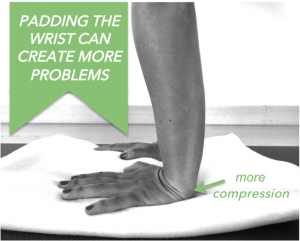
Practice with a firm mat instead of a soft one. Thick and soft surfaces (such as blankets) can create compression in the wrist. Soft supports (like two mats or blankets) create additional sinking into the soft surface and can create overextension in the wrist.
The body weight then shifts more into these “sinking points.” In doing so, the mounds of index fingers and thumb tend to lift which leads to a transfer of body weight into the outer wrist (ulnar part of the wrist). Although the softness may feel like temporary relief, it eventually leads to compression and more pain.
Change the Angle
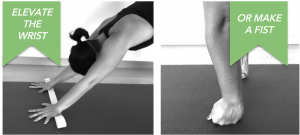
If necessary and helpful, use a yoga wedge or a folded belt to elevate the wrist. This helps to transfer weight off the wrist by changing the angle between the forearm and the hand. Be sure that when you prop up that you are only propping up the wrist resulting in it rising higher than the fingers. In some poses you can also make a fist (or even come onto your forearms) to create more stability in your wrist without much of an angle.
ANATOMY OF THE WRIST
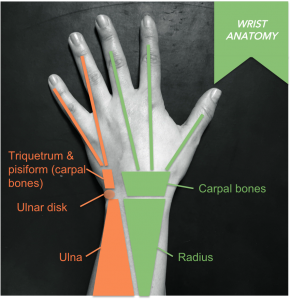
“ulnar hand”: ring and pinky fingers connecting to triqeuetrum & pisiform bones and ulna
The wrists consist of
the radius (the forearm bone on the side of your thumb),
the ulna (the forearm bone on the side of your pinky finger),
the carpal bones (the bones at the heel of your hand) as well as
various tendons and ligaments, which connect all of the boney structures and surrounding muscles named above.
One of the main differences between our foot and hand is that the foot has one major bone bearing the weight in standing – the heel bone. To our great frustration as yogis, there is no such boney equivalent in the hand to carry the weight of our body, which makes it necessary to skillfully use our wrist’s anatomy and alignment to distribute forces.
Let’s take a look at the set-up the body provides for this in terms of anatomy:
Inner Wrist, Radial Hand
The thumb, index and middle fingers connect to some of the carpal bones and eventually to the radius. The radius is much broader than the ulna at the wrist and can therefore bear more weight than the ulna. Viewed as the ‘radial hand’ in the diagram above, this stronger network of bones is often cued by yoga teachers to partially accept the weight of the body in downward-facing dog. How many times have you heard a teacher instruct you to press down between your thumb and index finger?
Outer Wrist, Ulnar Hand
The pinky and ring fingers on the other side connect to the triquetrum and pisiform bones (which are also part of the carpal bones) and ultimately to the ulna. As the ulna is rather narrow and small at the wrist, it is not meant to bear much weight. Viewed as the ‘ulnar hand’ in the diagram above, it is a weaker network of bones, but frustratingly tends to bear the brunt of the body’s weight when practitioners do not smartly use their wrists and hands. How many times have you had a yoga teacher correct a tendency for hands to roll-out to the pinky finger side in downward-facing dog?
Muscles and Tendons/Front and Back Balance
The muscles and tendons responsible for flexing your hand (as in making a fist) run on the palmar side of your wrist, while the muscles and tendons for extending your hand run on the back side of your wrist. The balance of strength and flexibility across the front and back of the wrist is important in ensuring stability and range of motion. The ability to extend the wrist and place the palm flat on the ground requires flexibility here, and the ability the ‘brakes’ on forward motion into the hands in arm balances like handstand requires strength here.
Stay tuned for part two looking at common injuries and pitfalls of practice and a self-care routine of warm-up and cool-down to keep your wrists happy.


